
How to Setup Your Zyxel EMG-3525 Fibre Router
The Zyxel EMG-3525 is a gigabit-capable router, with high speed dual-band WiFi.
We’ve divided our setup guide into 4 different sections, depending on your experience level you can skip ahead to the one you need, or start right from the beginning.
- Unboxing and Router Info
- Plugging in and Connecting to Your Router
- Quick Setup Guide
- Manual Internet Setup
Unboxing and Router Info
Follow these steps to familiarise yourself with your new router.
Unboxing Your Router
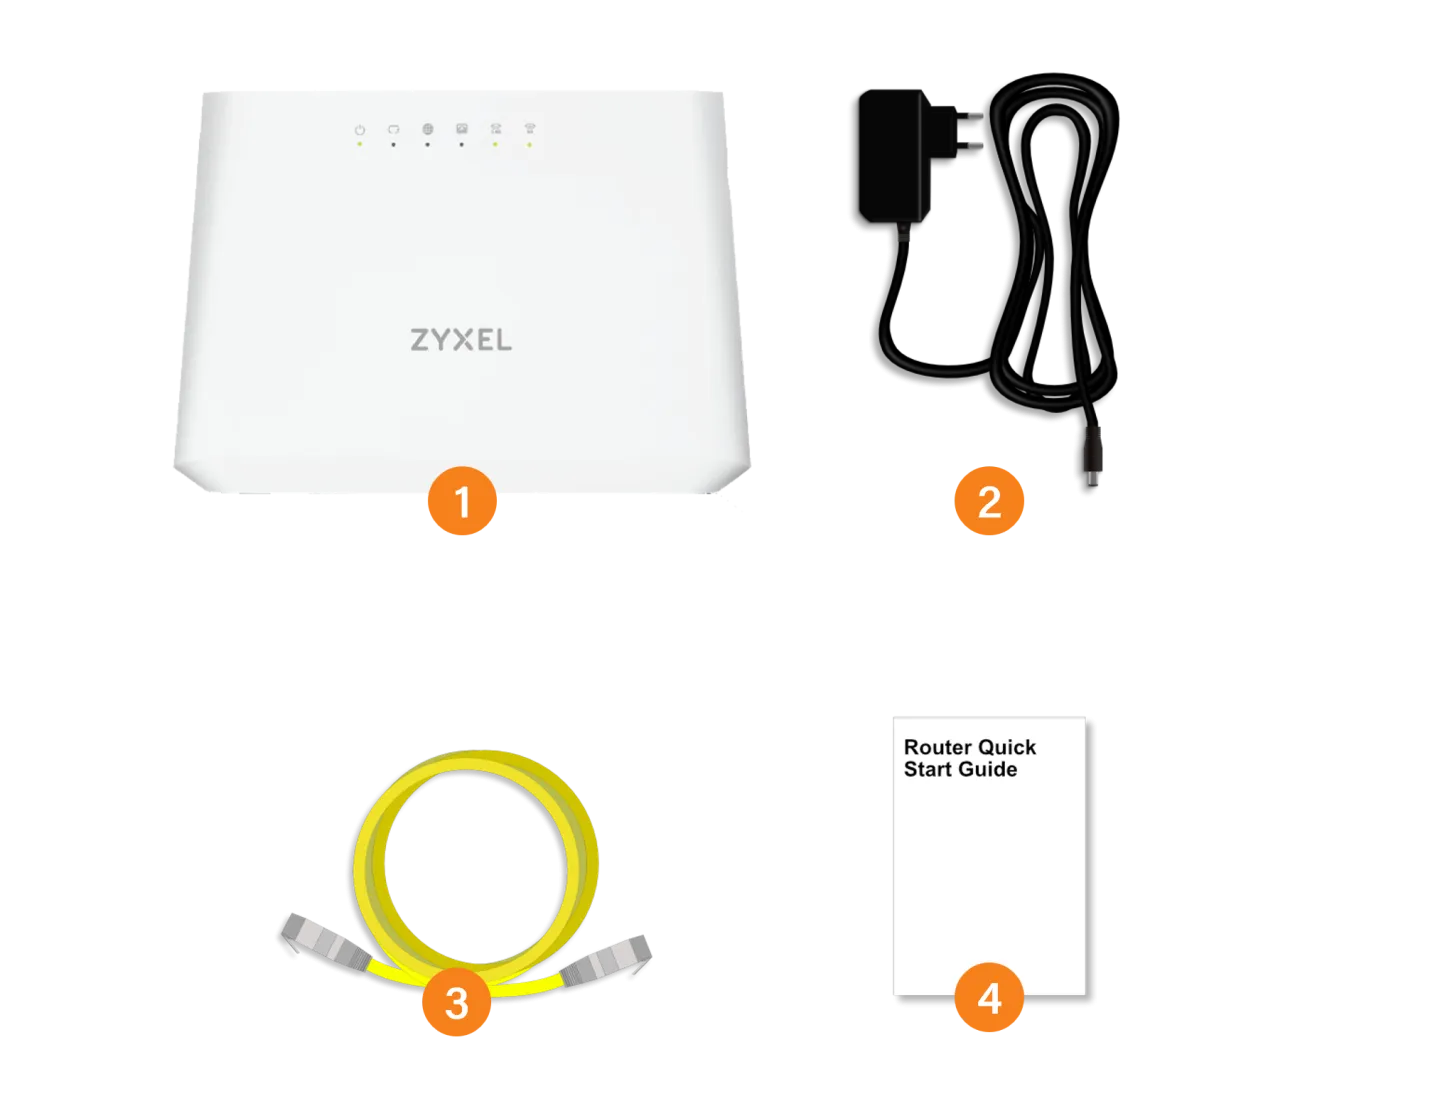
In the box you will find:
- Zyxel EMG-3525 router
- Power supply
- Ethernet cable
- Quick start guide
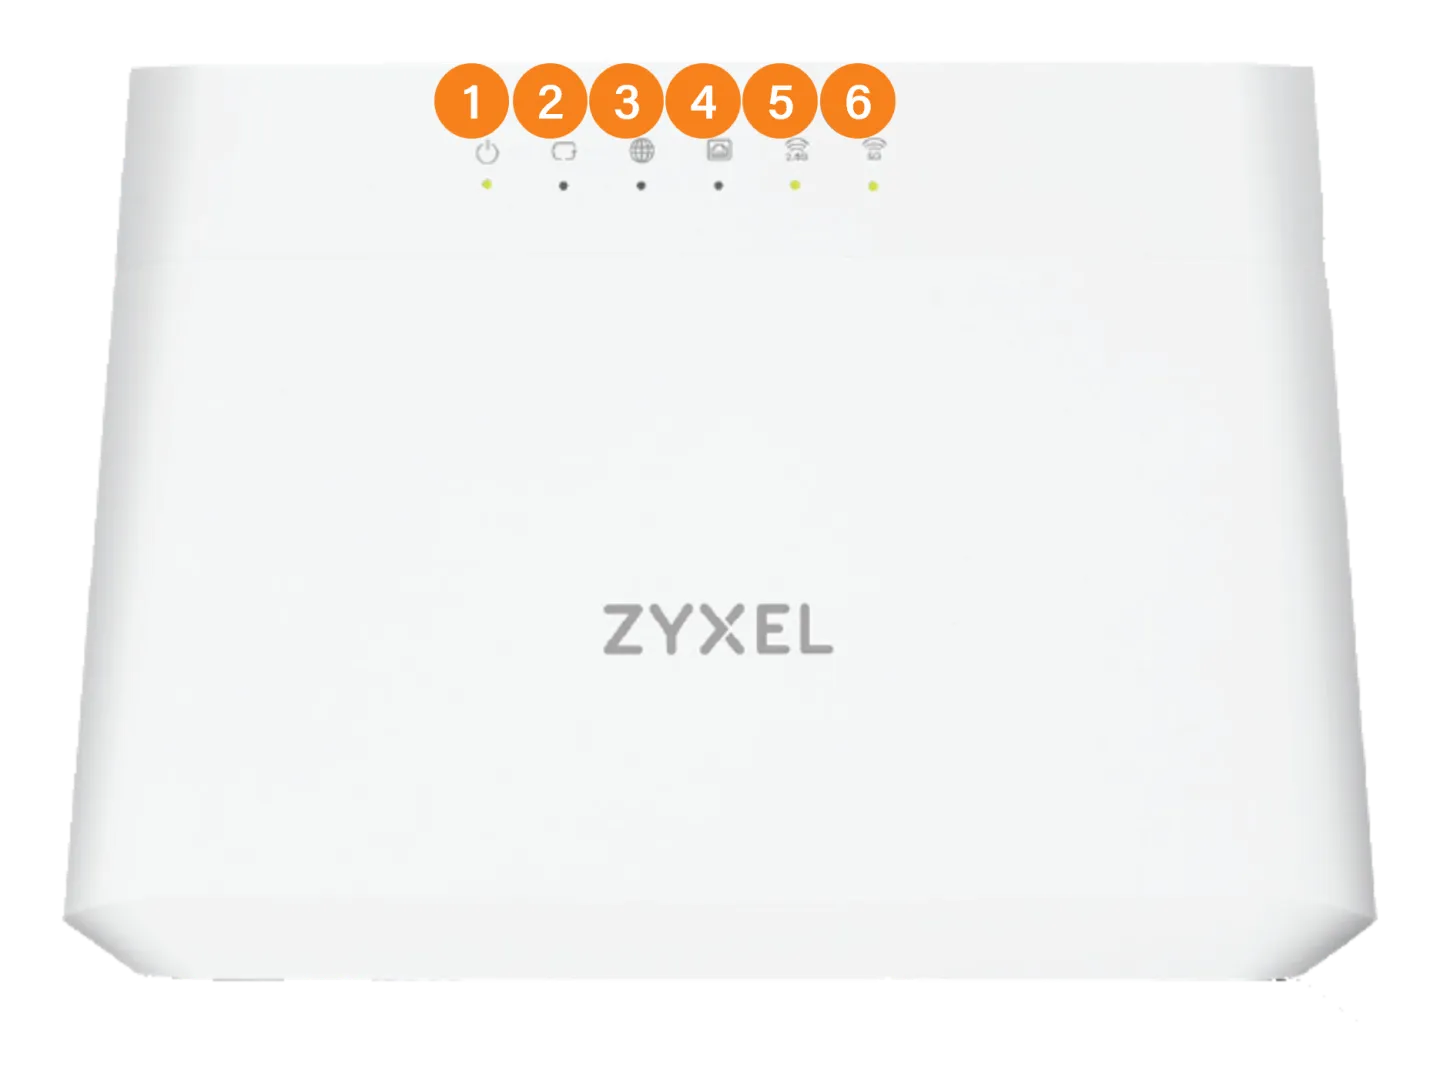
Front Panel Lights
Familiarise yourself with the lights on the front panel.
You should see the following:
- Power
- Ethernet WAN
- Internet
- LAN 1-4
- 2.4Ghz WiFi
- 5Ghz WiFi
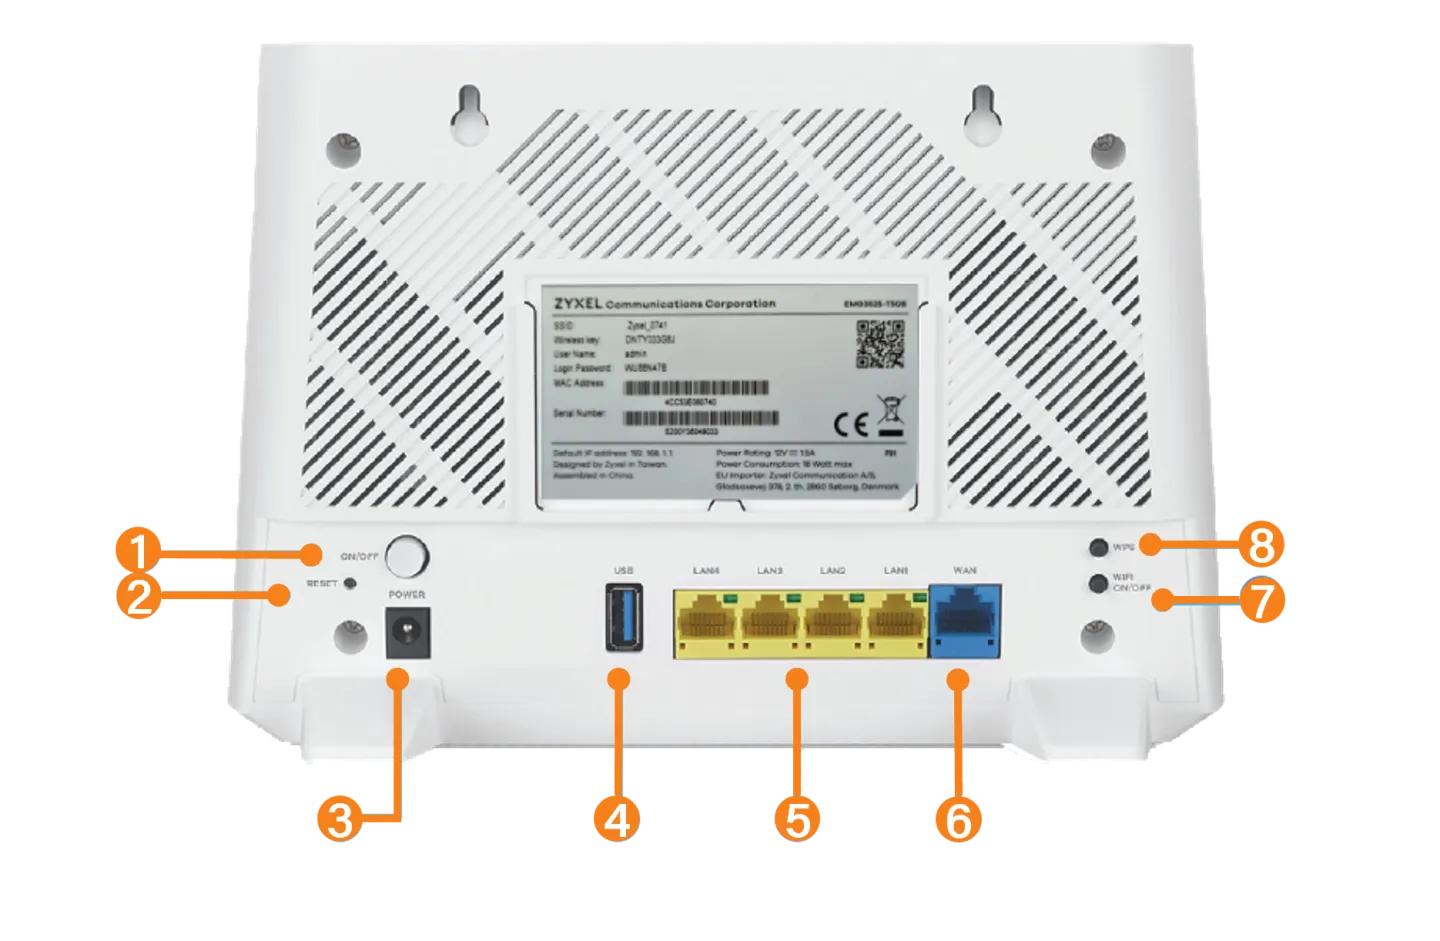
Ports and Connectors
On the back panel, you should see the following :
- Power button
- Factory Reset switch
- Power IN
- USB port
- Ethernet 1-4
- Ethernet WAN
- Wifi On/Off
- WPS
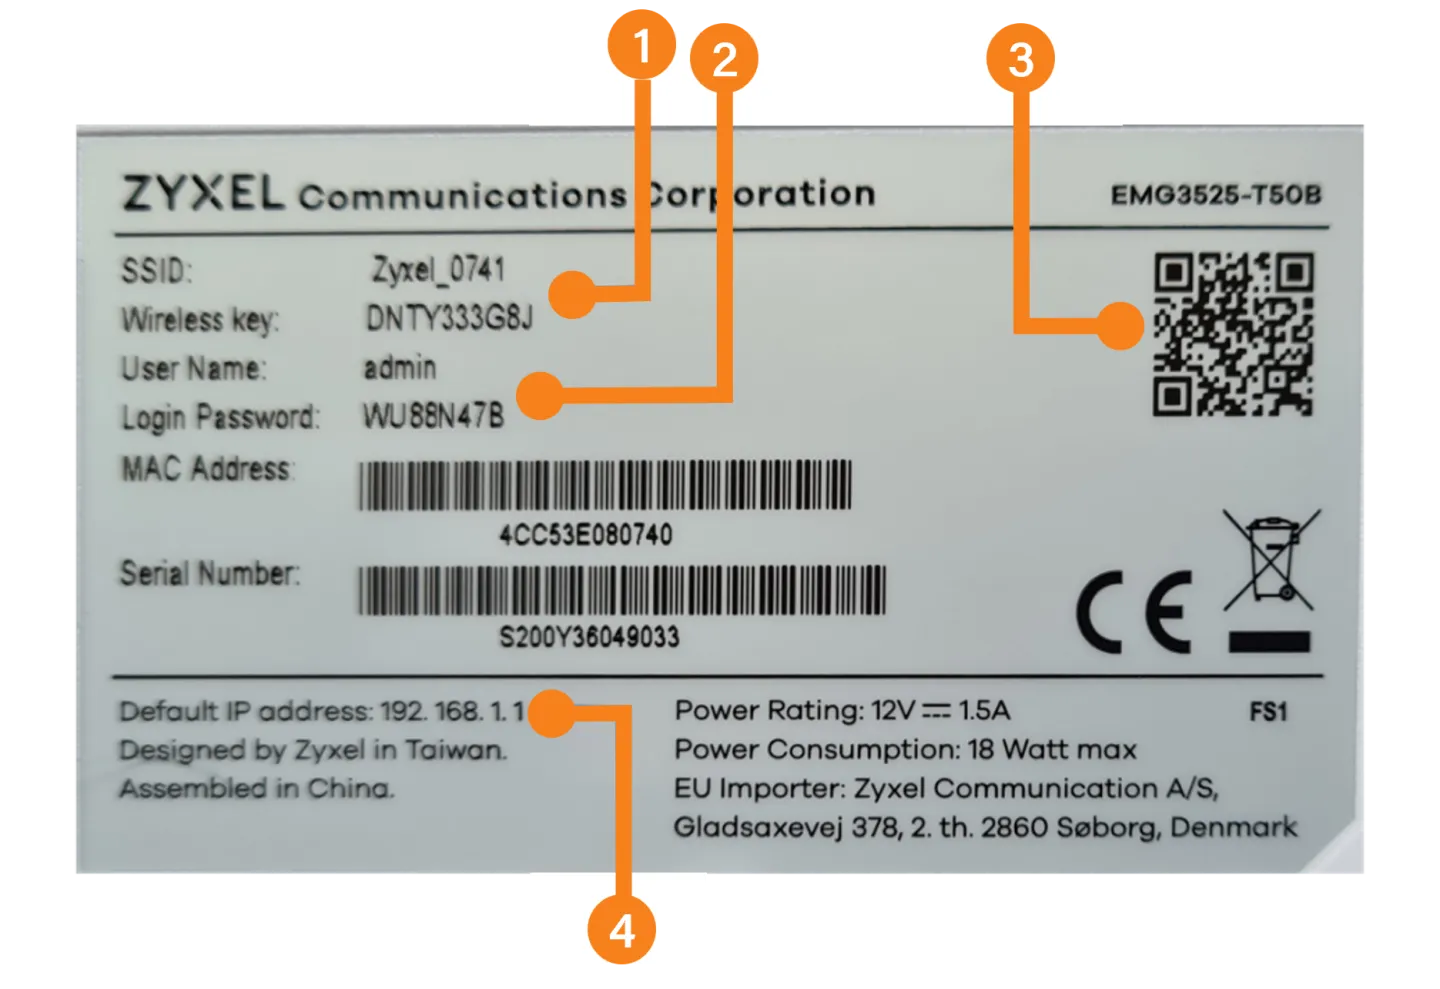
Info Sticker
You will need the information on the sticker on the underside of the router. We recommend that you take a photo of the sticker with your phone before commencing with plugging in and setting up.
- Default WiFi SSID (network name) and password
- Default admin username and password
- Default WiFi QR Code (you can use this for a quick setup from your phone)
- Default router address
Plugging in and Connecting to Your Router
Follow these steps if you need assistance plugging in and connecting to your new router.
Plugging in the Router
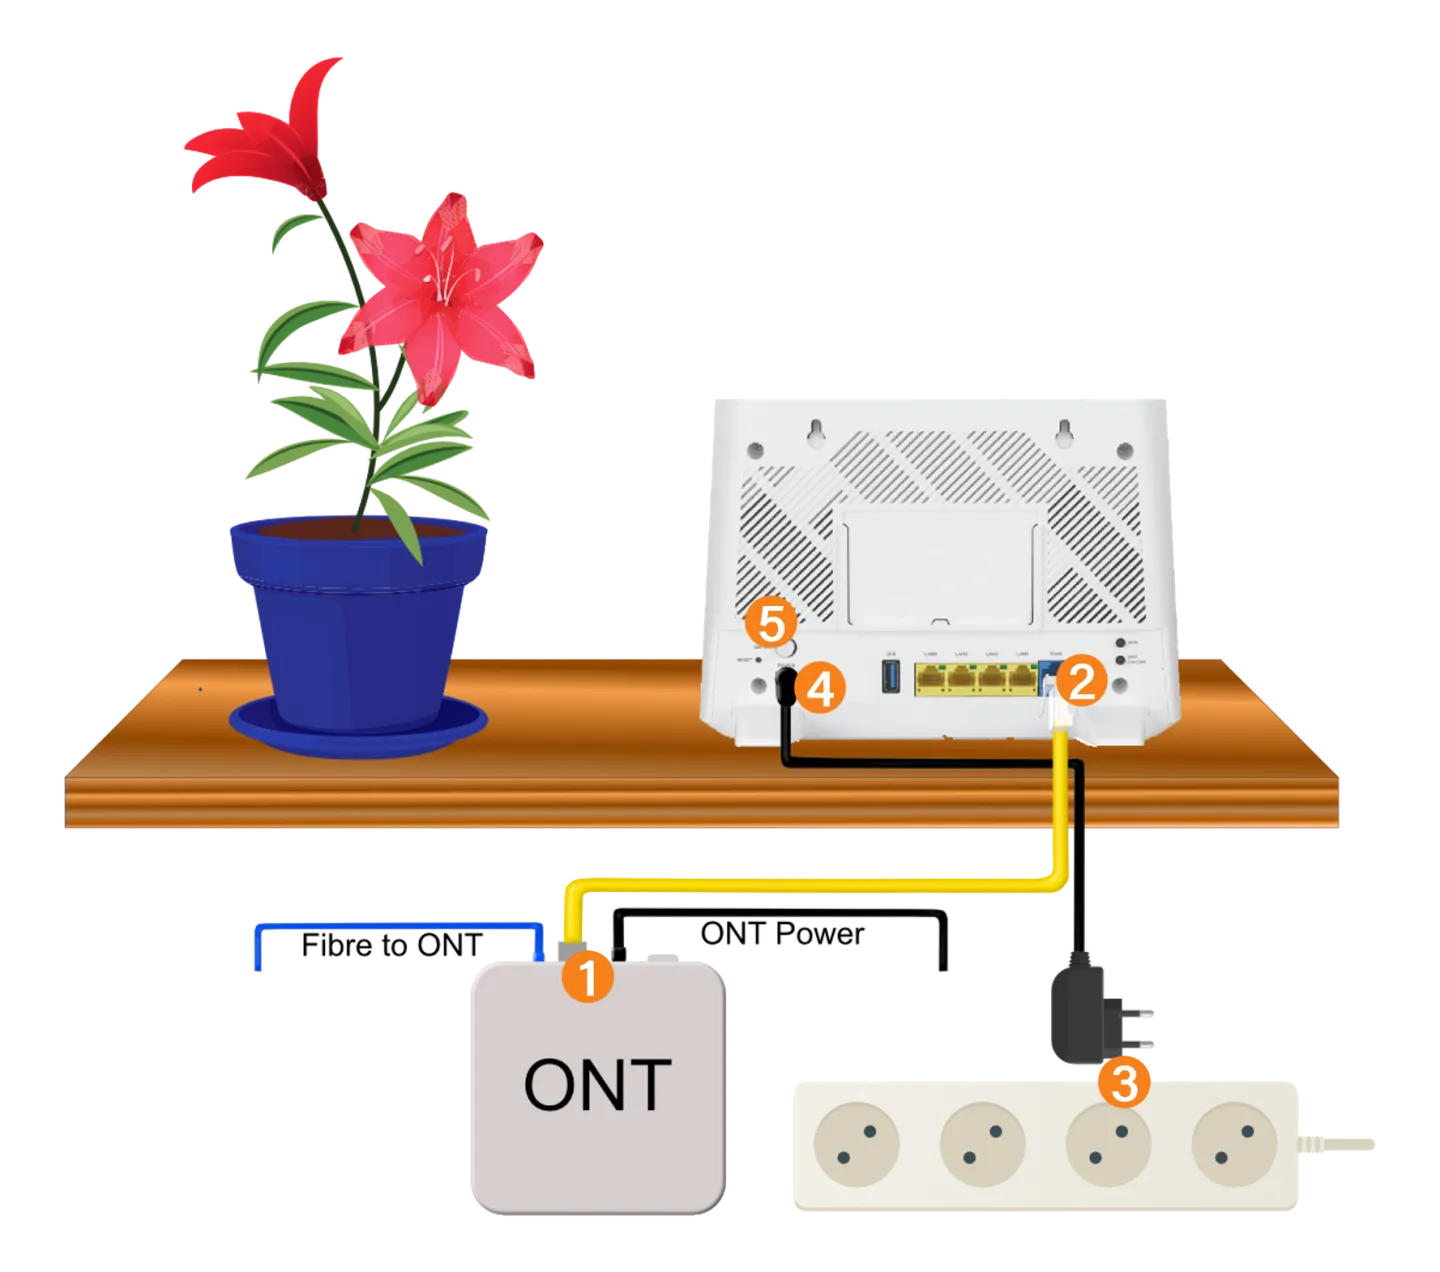
Now that you’re familiar with your router, let's connect it to your Fibre ONT and the power:
Using the yellow ethernet cable provided, connect the LAN port on the fibre ONT device (1) to the blue port labelled WAN on the back of the router (2)
Plug the router's power supply cable into the wall power supply (3) and into the small round power socket on the back of the router (4).
Switch the power on at the wall socket and then press the Power On/Off button (5) on the router.
Connecting via Ethernet
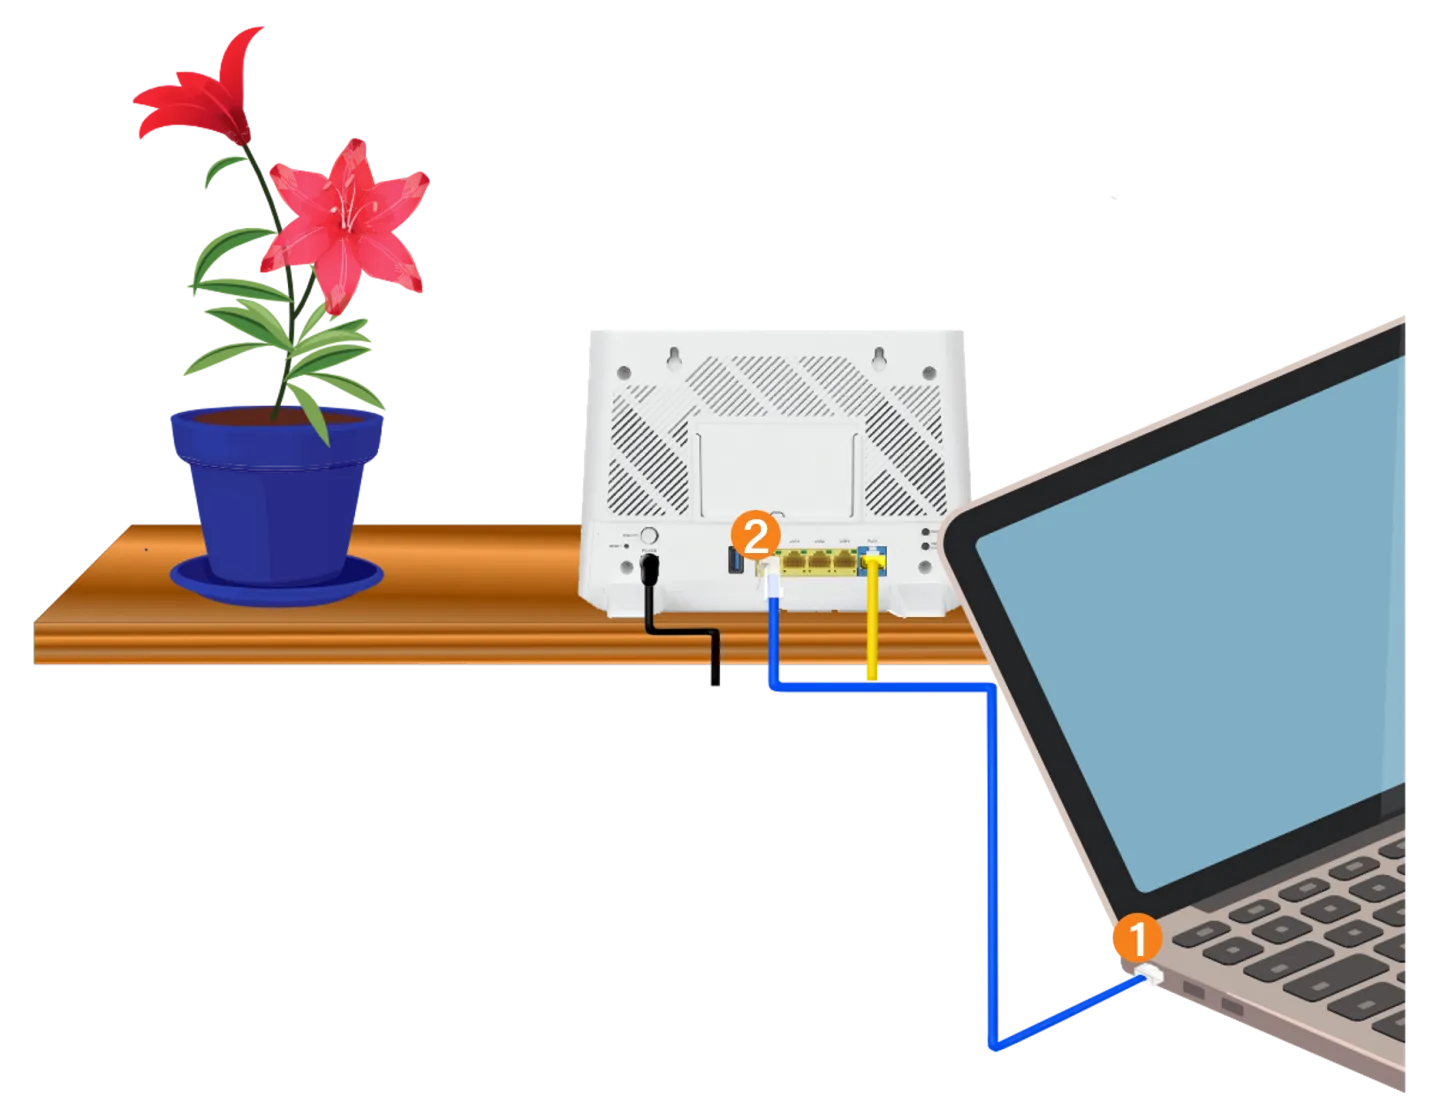
If you have any devices connecting with an ethernet cable or if you’re plugging in your laptop to complete the quick setup, you can connect them now.
Plug one end of the Ethernet cable into the Ethernet port of your desktop or laptop (1)
Plug the other end into the yellow LAN port labelled “LAN1, 2, 3 OR 4 (2) at the back of the router .
Connecting via WiFi
If you do not have access to an ethernet port on your device, you can simply connect to the default WiFi network. Refer to the sticker at the bottom of your router for the default password. You can use this password to connect to your preferred WiFi network on your device.
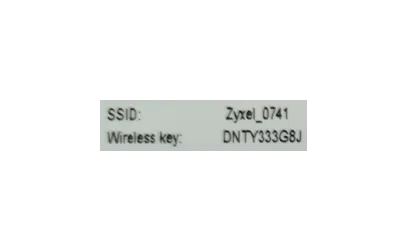
Connect to 5Ghz for faster speeds and 2.4Ghz if you’re further from the router.
Router Setup Wizard
Follow these steps if you need help with your router’s Setup Wizard.
Log Into Your Router Through Your Preferred web Browser
You don’t need internet for the next part. Simply open your web browser (e.g., Google Chrome, Firefox, Microsoft Edge, etc.).
Type the default address in your address bar: (192.168.1.1)
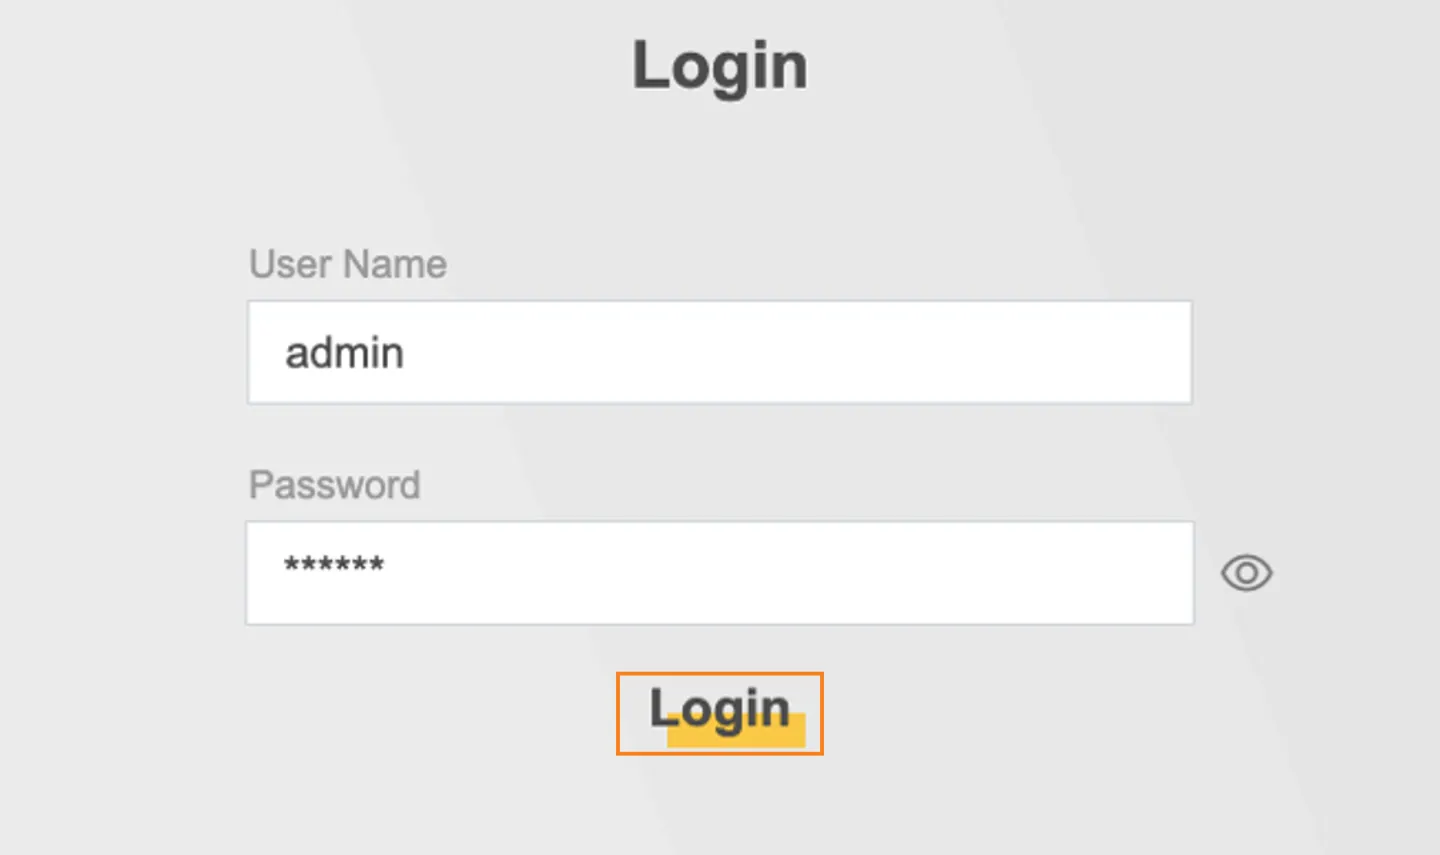
Login using the default username and password
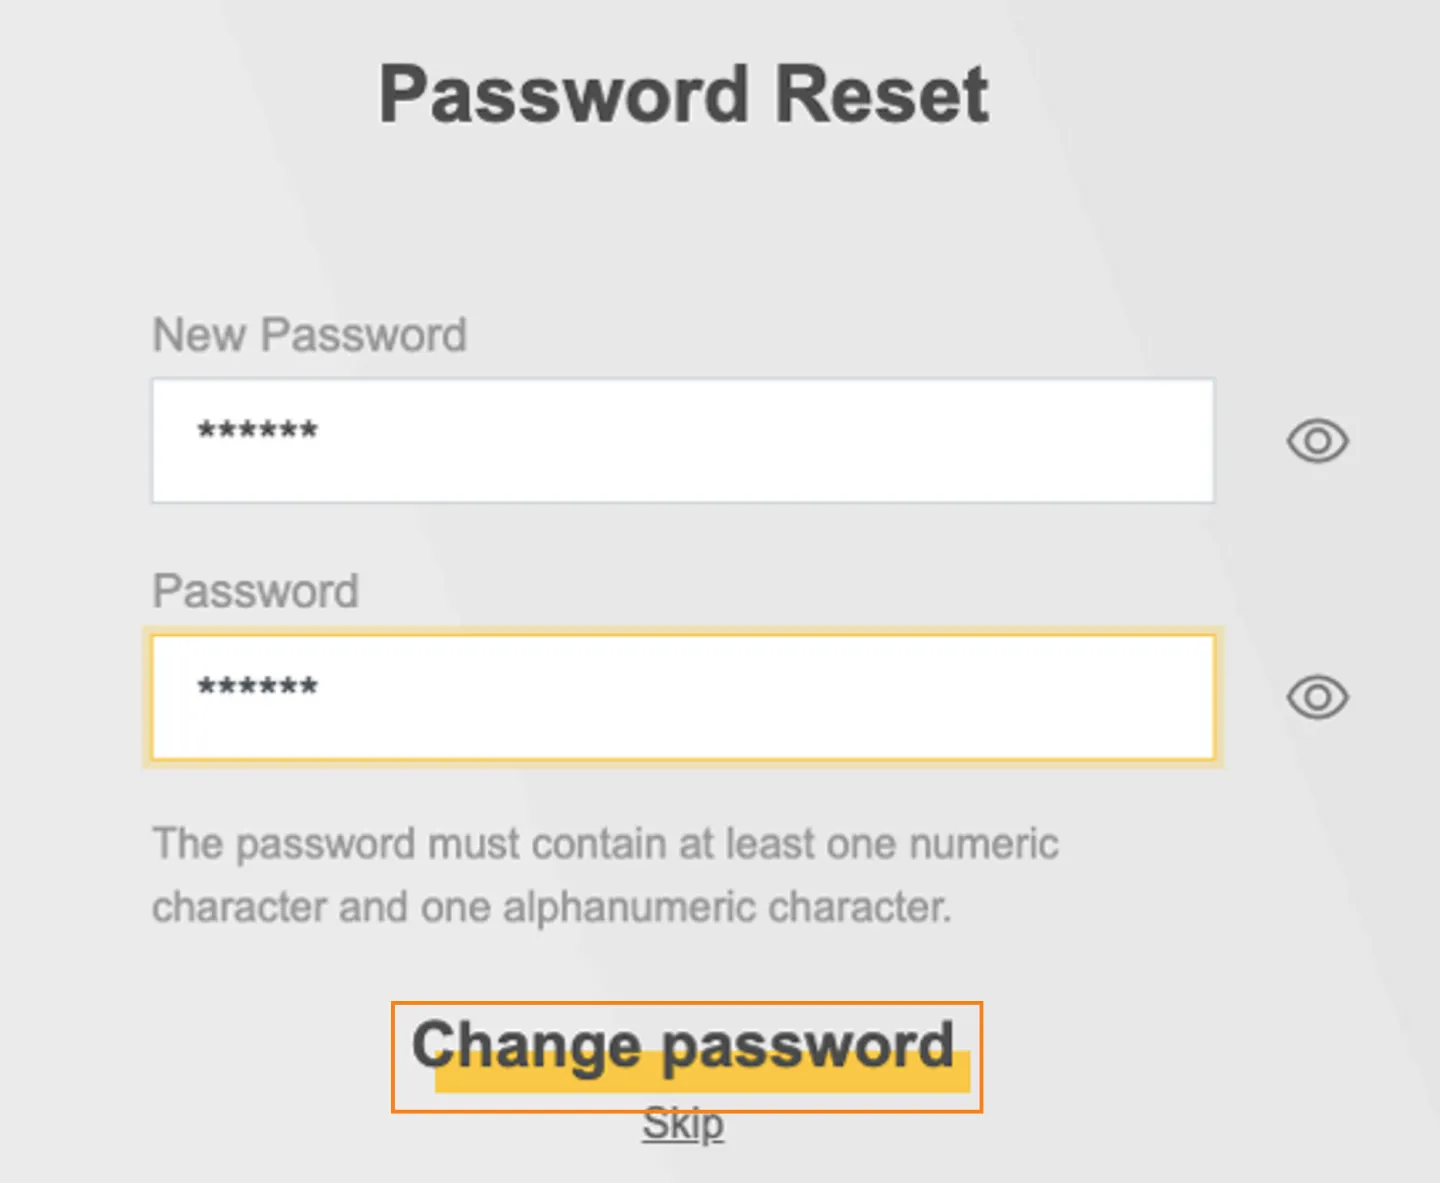
Password Reset
If this is the first time you are logging into the router you will be prompted to change the default password (recommended)
Enter a new password twice and click on Change Password to continue.
Start the Setup Wizard
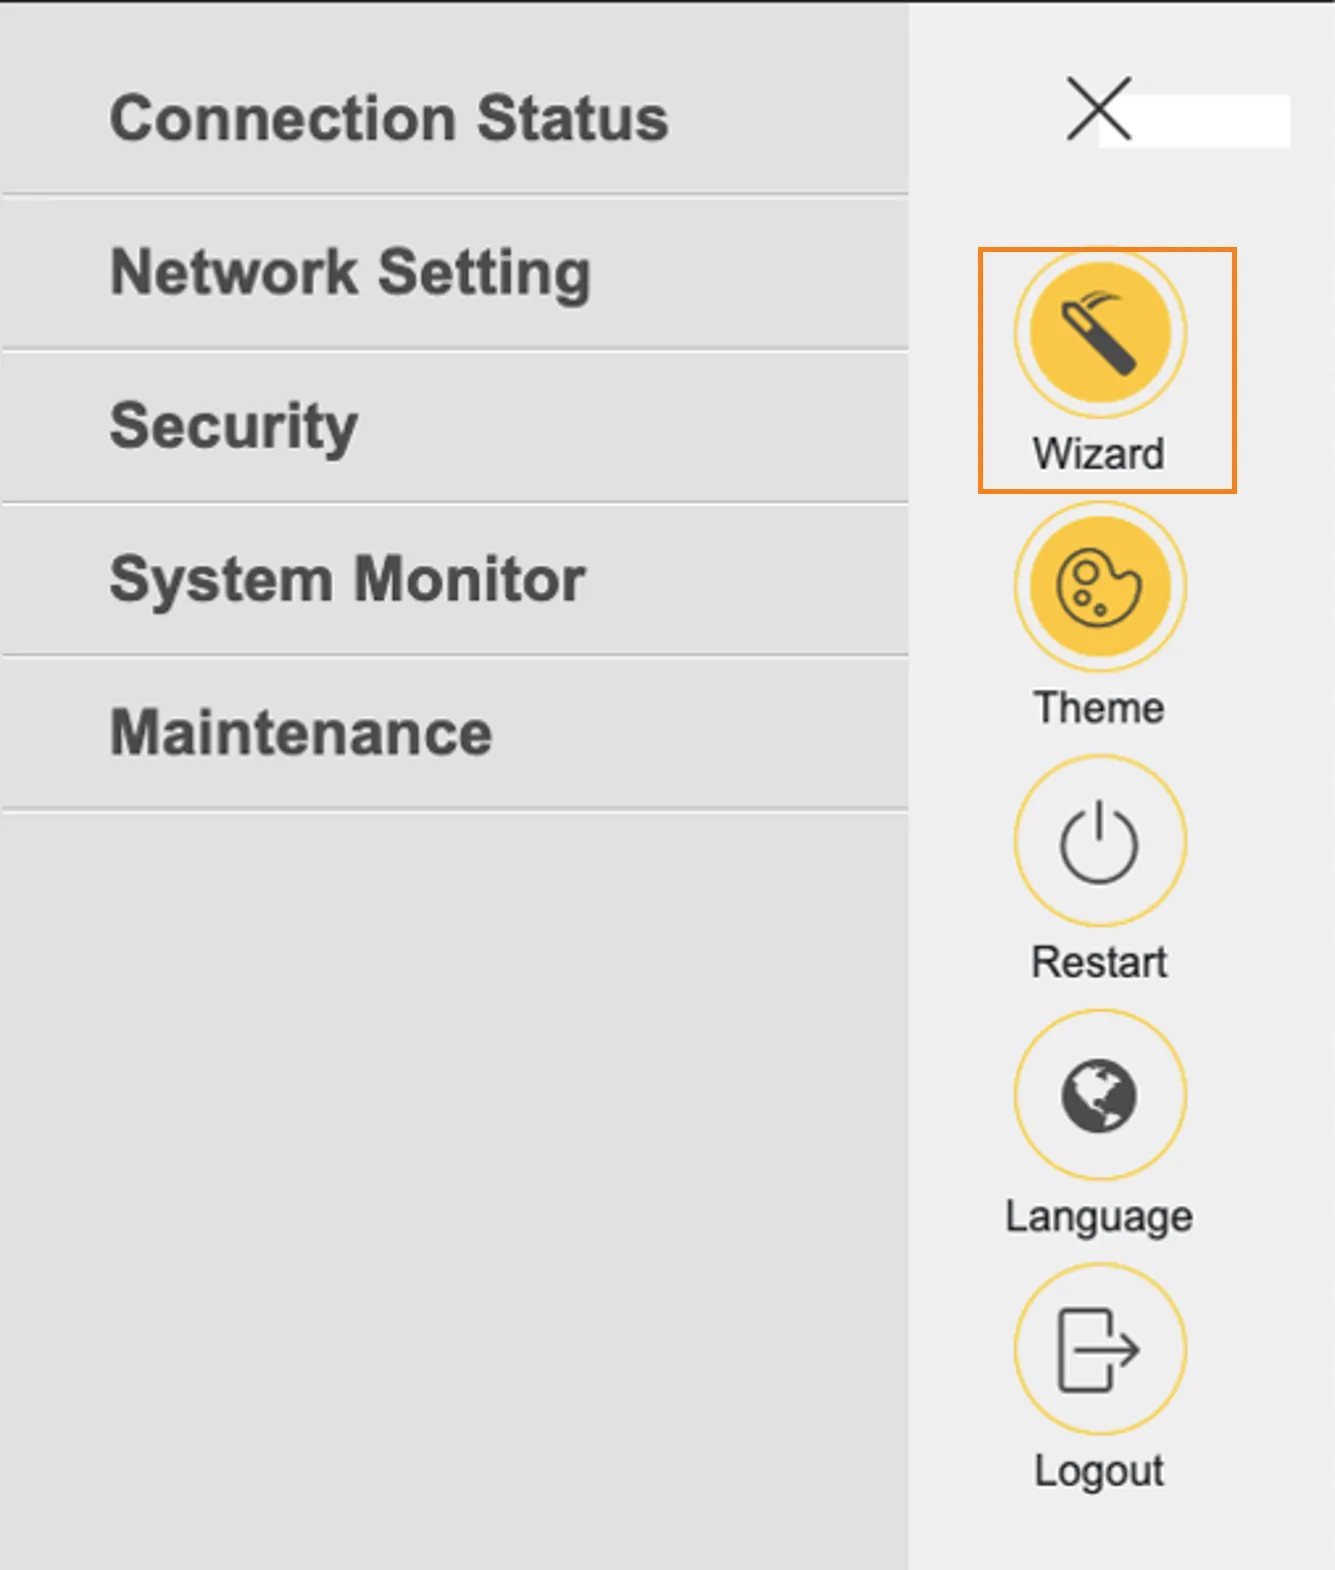
If this is your first time accessing the router, the setup wizard should start automatically
To start the wizard manually, access the 3-stripe (hamburger menu in the top right-hand corner) and Select Wizard.
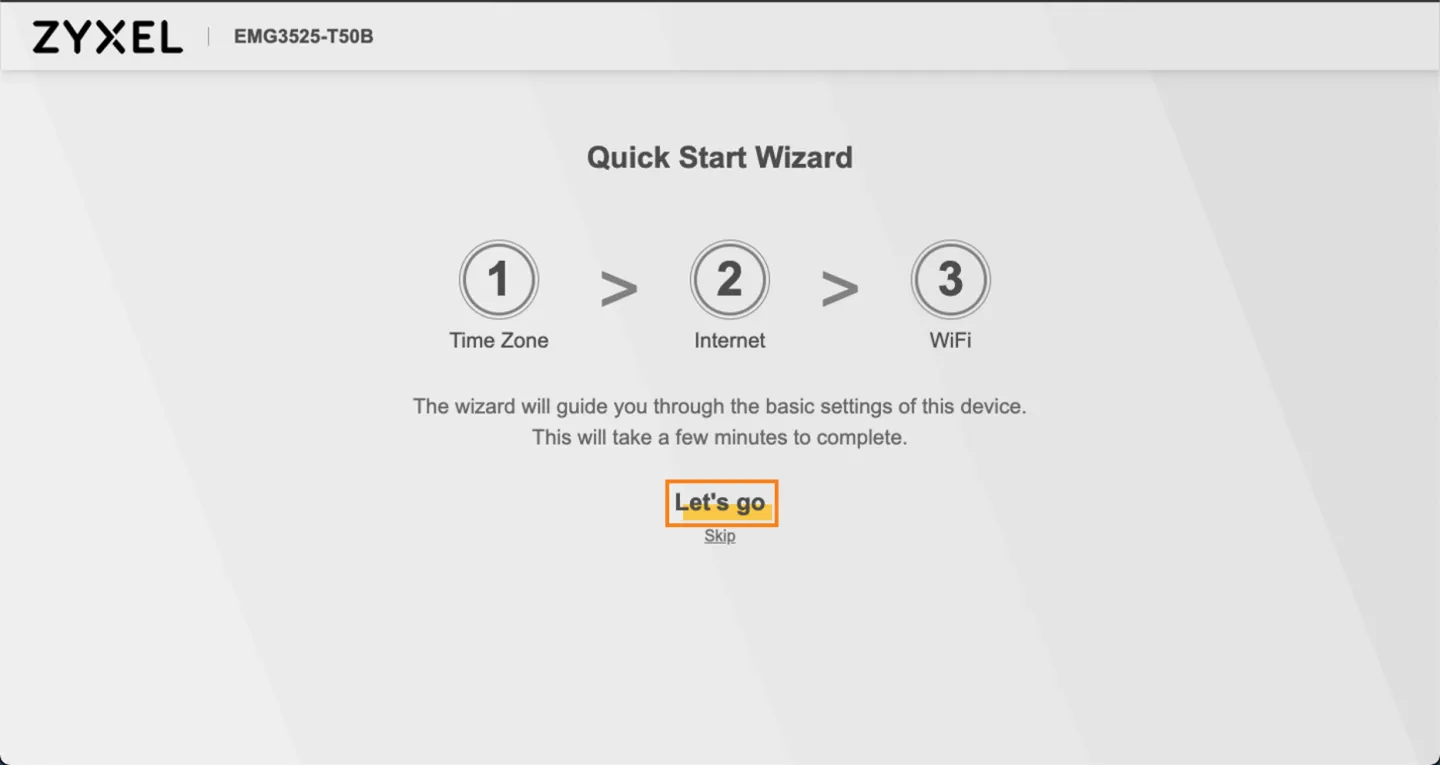
Start the Setup Wizard
When the wizard appears click on Let’s Go to continue.
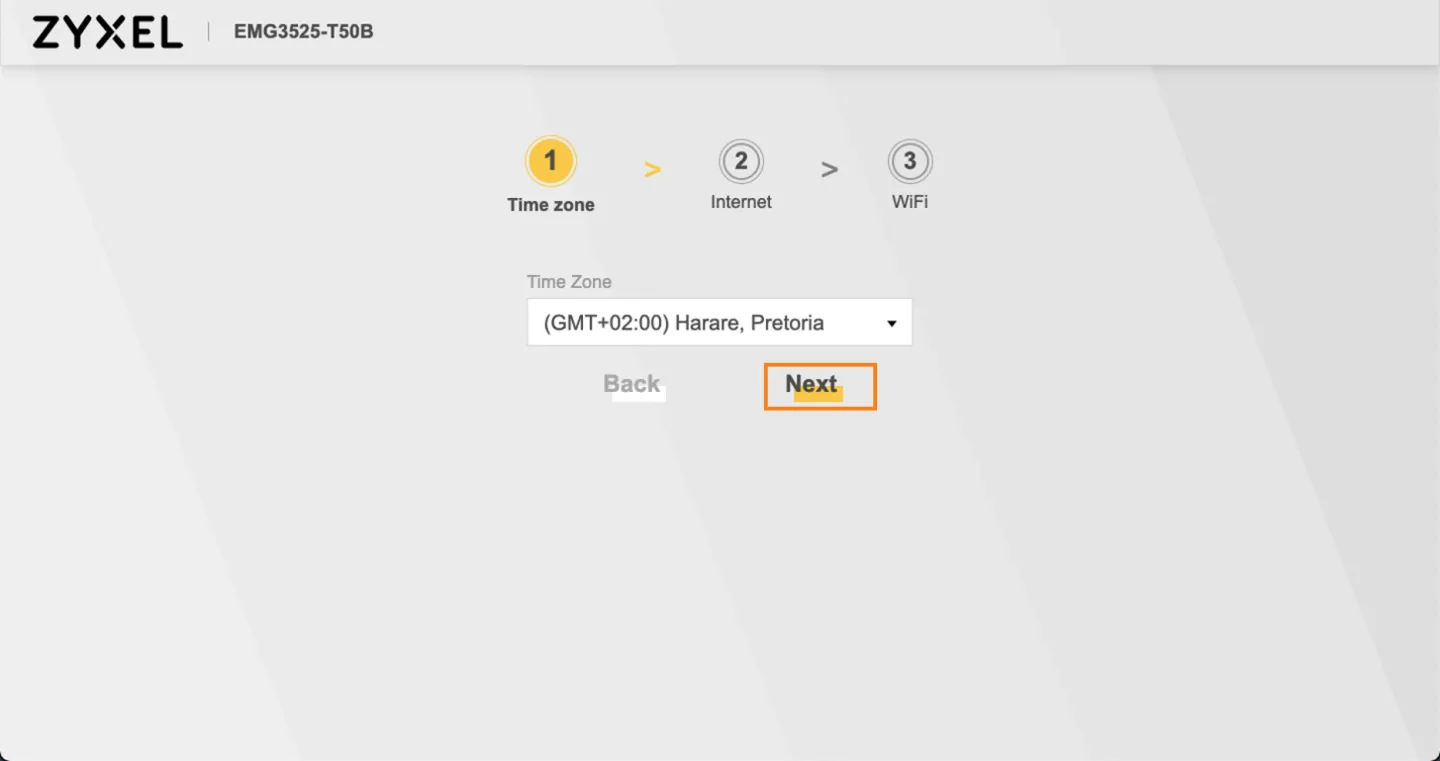
Time Zone
The time zone should be correctly defaulted to GMT +2:00 Harare, Pretoria.
Click Next to continue.
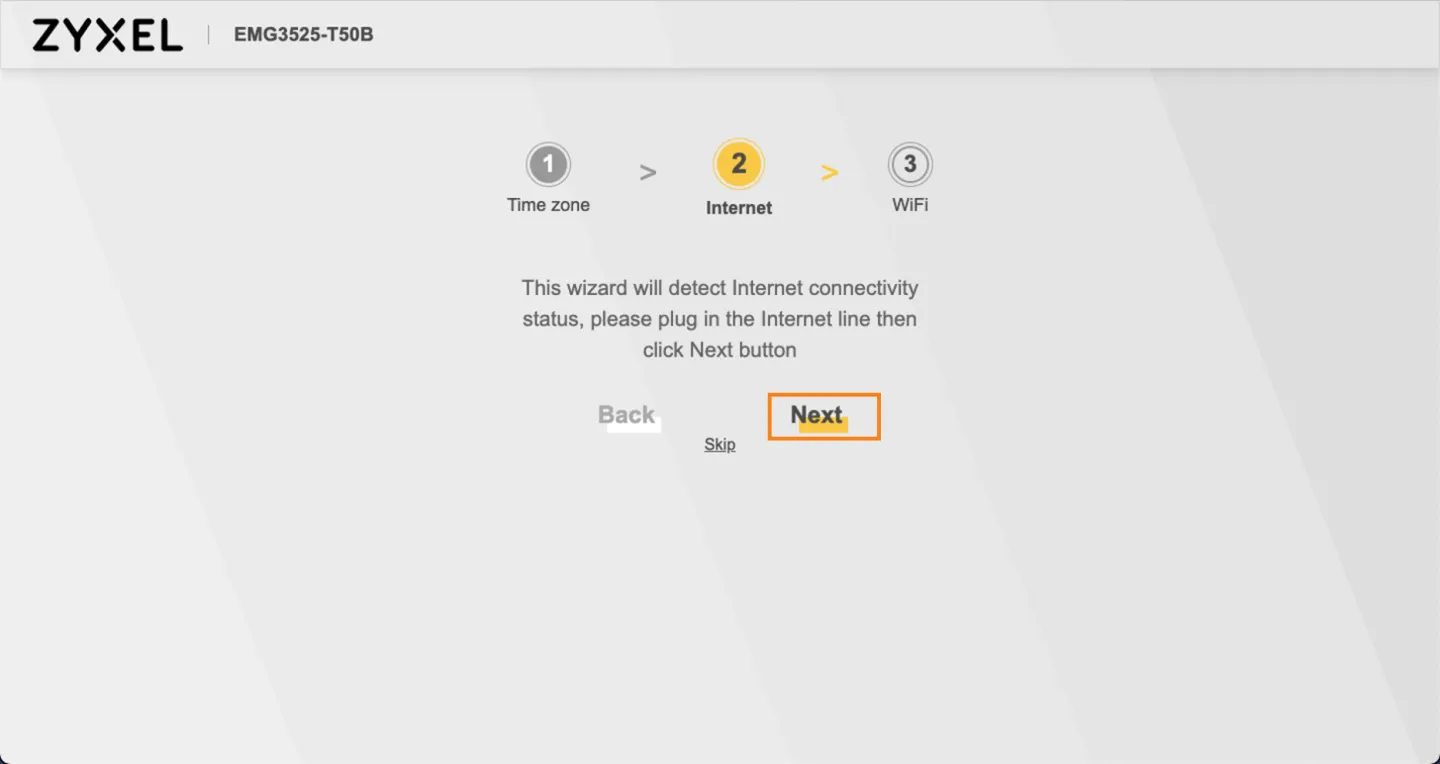
Detecting Internet Connection
The Wizard will detect if there is an active connection on the ethernet WAN port and attempt to configure it automatically.
Mweb uses an automatic configuration system which pairs your Mweb supplied router with your account and should automatically set up your connection in most cases.
Click on Next to attempt automatic setup.
Detecting Internet Connection
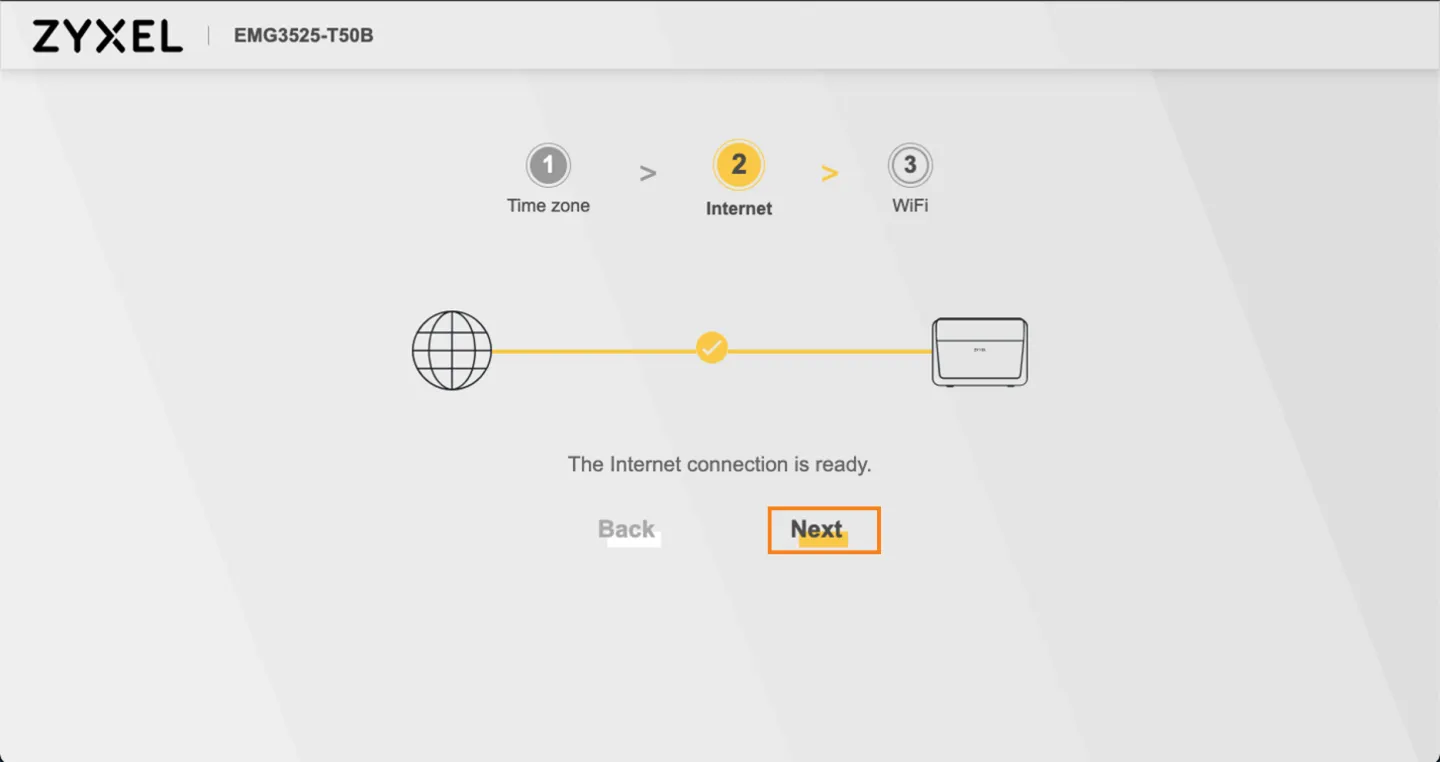
Once the connection attempt is complete you can click Next to move to the next step
WiFi Settings
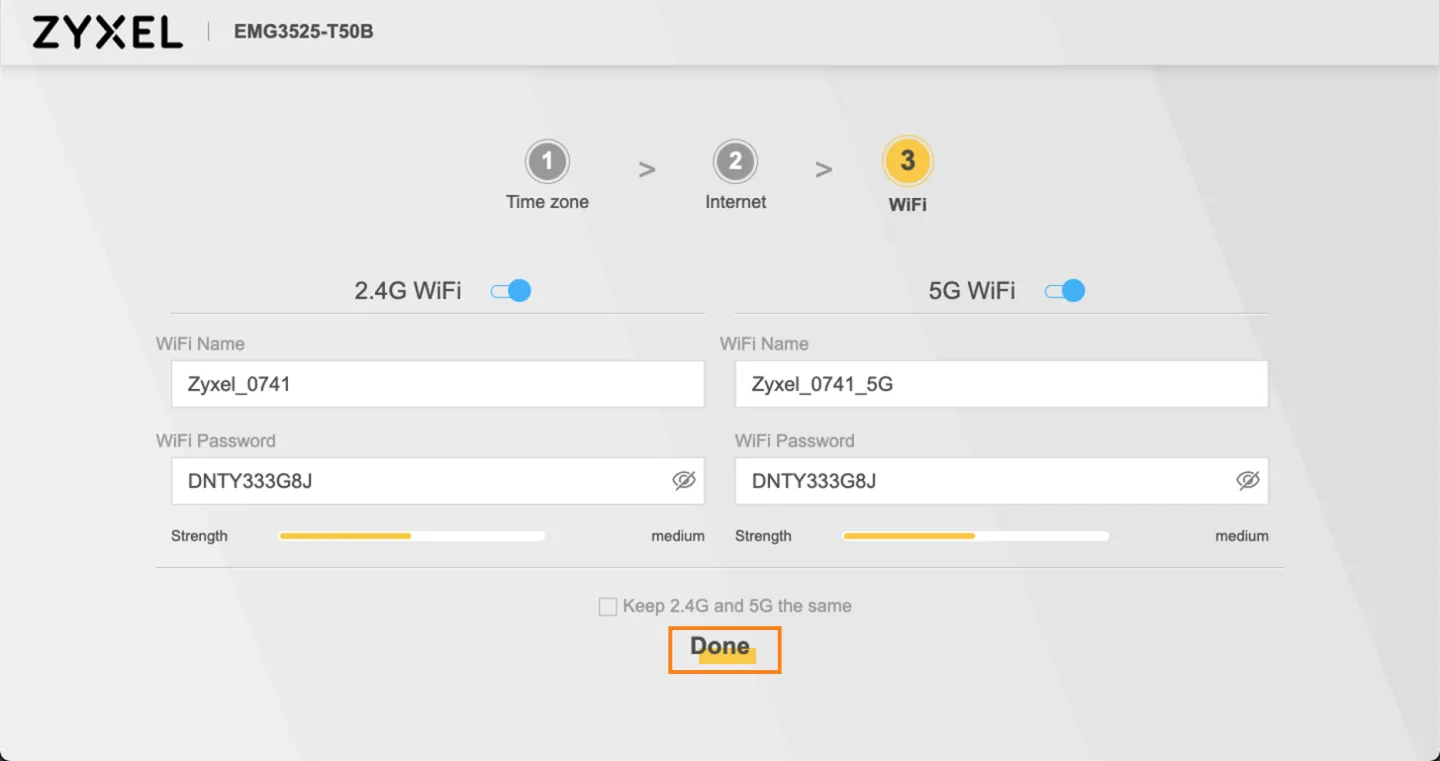
The wizard will present you with the default WiFi settings, which you can either change, or leave them as is.
If you’re uncertain about what WiFi settings you need, you can review the WiFi recommendations for more advanced users below.
When you are finished, click "Done"
Status Screen
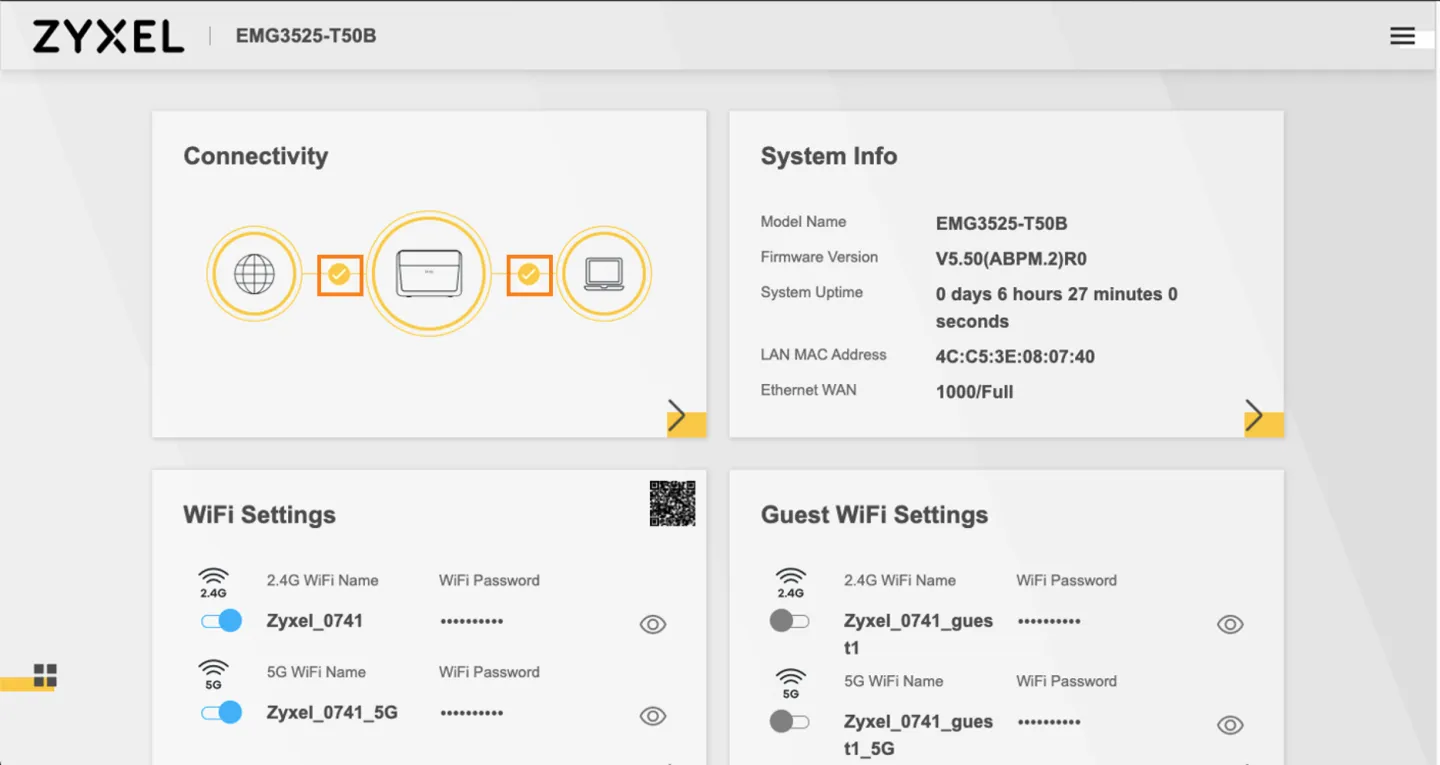
Once you are back at status screen you should see all ticks in the Connectivity block at the top left, which means everything is working.
Manual Internet Setup
If your internet connection is not working as expected, or you are being redirected to the Mweb website with a login error you may need to proceed to the next section.
Open Broadband Settings
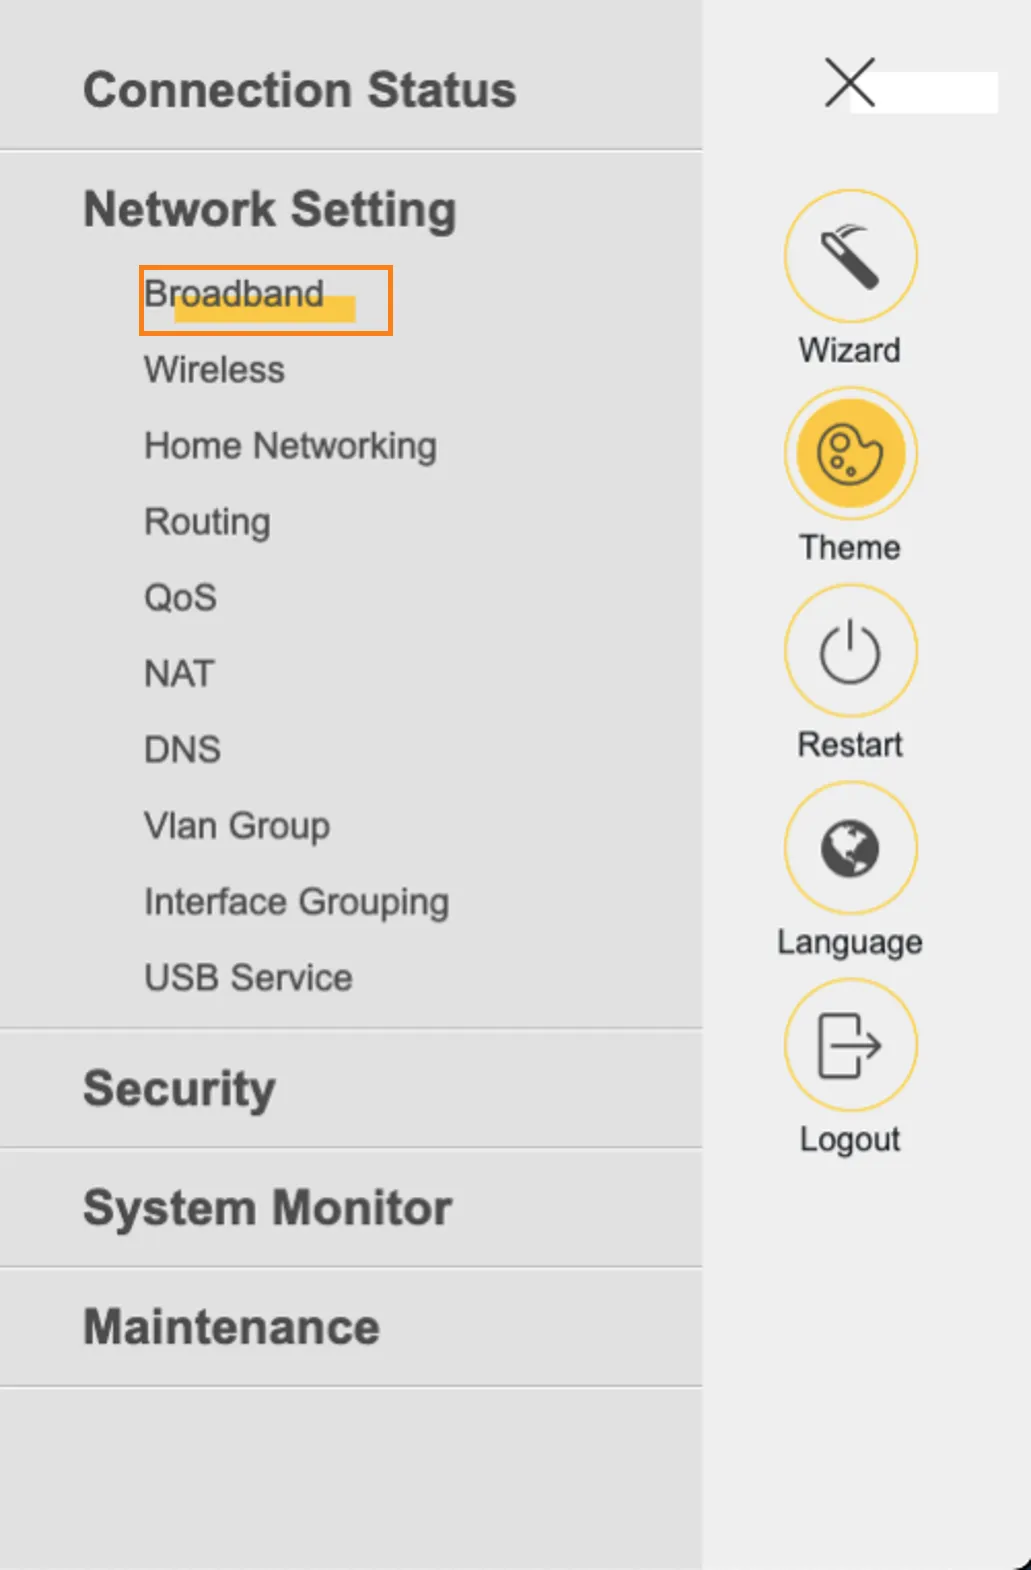
Click on the 3-stripe (Hamburger menu) and choose Network Setting > Broadband
Edit WAN Connection
WAN is short for Wide Area Network.
This is where your Mweb login details are set on the router.
Mweb supplied routers should automatically be linked to your Fibre service, but sometimes you may need to enter these settings manually.
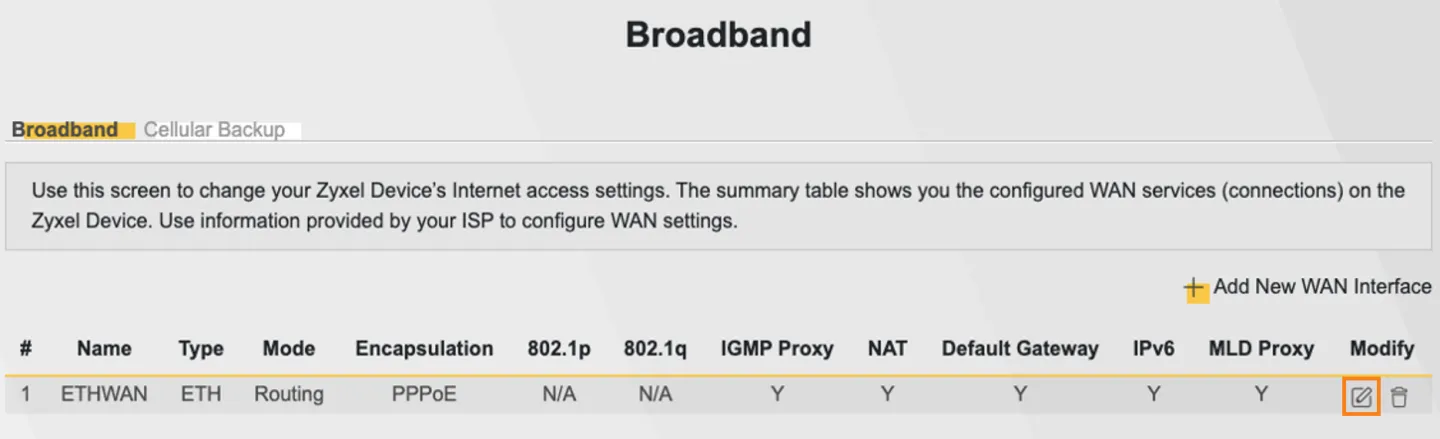
Click on the Pencil (edit settings) icon at the far right.
Enter Network Settings
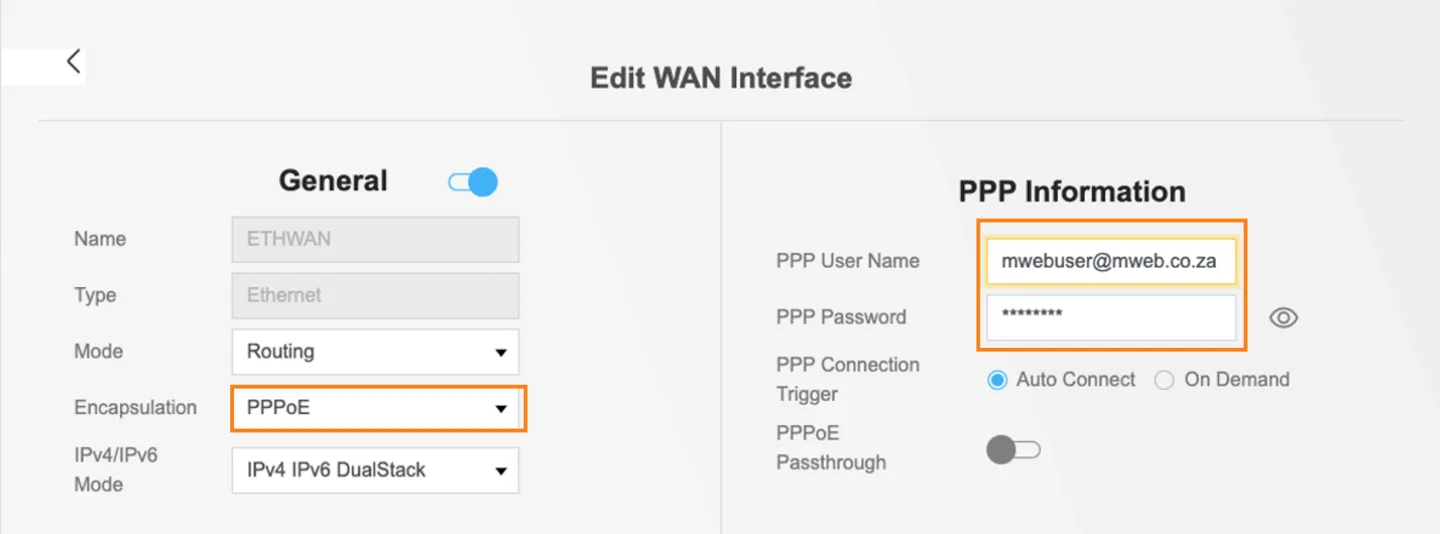
•Your connection type under General depends on which Fibre network you are connected to and should have been autodetected.
•If it is set to PPPoE (which is the most common), you will need to enter the Fibre username and password provided to you during sign-up in the PPP Information block on the right.
Apply Settings
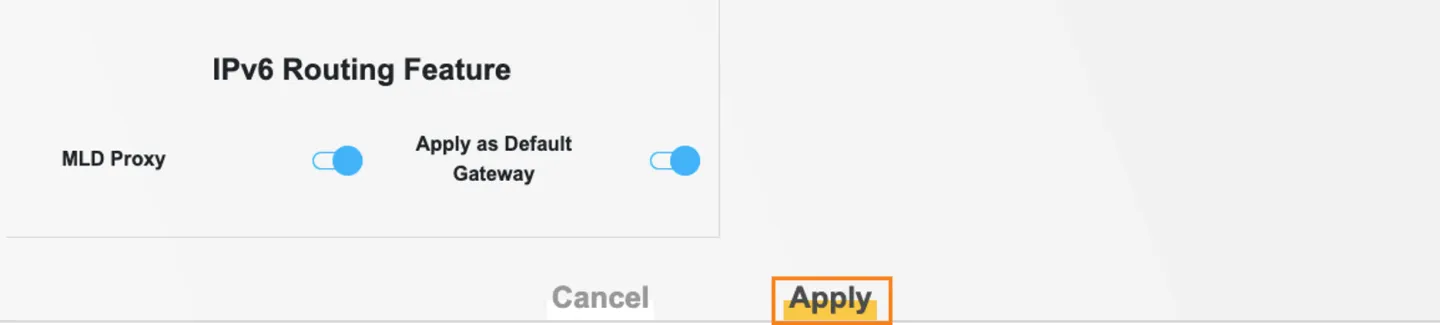
Once you have entered your details scroll all the way to the bottom of this section and click Apply.
If you’re struggling to get connected, try following this guide on basic connection troubleshooting and call for help if you need it:
- Connect to LAN1 on the ONT unless otherwise instructed.
- Connect the ONT to the WAN port marked in blue.
- Please use only the cables provided with the new router and avoid using cables from older routers. Some older routers were equipped with 4-strand LAN cables that can cause problems with Gigabit ONTs.
- The WiFi login details are printed on the back of the router.
- If you don’t know your Fibre product username and password you can use your master account username and password to log in to your online MWEB Account and follow this guide to retrieve them.
- If your connection type was detected as IPoE, then it means you have an assigned network address and do not connect with a username and password.
- If you're using a UPS, ensure it's configured for 12 volts. If you have a single-port UPS and intend to split power between the router and ONT, make sure it has sufficient wattage capacity to handle the load.
- If you plan to use a UPS, store the ONT and router power supplies safely in case you need them in the future. Note that the ONT power supply belongs to the Fibre Network Operator (FNO).
Most users may choose to leave the device in its default state indefinitely, but the router access password and WiFi login password should be changed.
More tech-savvy users can opt for further customisation. Should the need arise, you can reset the device.
Was this article helpful?