Overview of Mweb Webmail
Overview of Mweb Webmail
Mweb Mail users can send and receive email messages, view their calendars and create appointments, create or review tasks and more, from anywhere in the world, using any computer or mobile device and a simple web browser. In addition, Mweb Mail is fully compatible with any desktop email client such as Microsoft Outlook or Apple Mail, or mobile email, contacts and calendar apps on Android and iOS. To log in to Mweb Mail simply use the Email link to the Mweb Homepage. Once on the login page, type your full email address and password in the appropriate fields to access your account.
Navigating Email
When you go to the Email section of Mweb Mail you'll generally start with your Inbox as it's the primary location all new email resides. While you can have content filters set up that route email to different folders or locations, your Inbox is, by default, the starting point for anyone using Mweb Mail. Once here, you'll see that the interface is separated into various sections.
Show/Hide Icon
At the top of the folders view you'll see the show/hide icon. This allows you to hide or show your list of folders, which is extremely beneficial when viewing your Inbox on smaller devices, such as tablets and phones.

Default and Custom Folders View
The left side of the interface displays your folders. Here, you'll see the default folders listed at the top:
- Inbox
- Drafts
- Deleted Items
- Junk Email
- Sent Items
These folders are created for every mailbox within Mweb Mail.
Below the default folders are the custom folders that a user creates. If additional folders are embedded within a main parent folder, an icon is displayed to the left of that folder's name. Clicking the icon will expand that folder and display the additional, embedded folders. Clicking it again will hide those folders.
Read more about Managing Folders in Mweb Mail.
Messages View
To the right of your folders is the Messages view. Here, you'll see a list of all of the messages in your inbox or that reside in whichever folder you're currently in.
At the top of the messages view are buttons or icons representing various ways to interact with the messages in your list:

- Select
- Search
- Sort
- Filter
- Actions (⋮)
Email Interactions
There are a number of different ways to interact with messages in Mweb Mail. Buttons such as New are fairly self-explanatory, but others have multiple different options.
Selecting Messages
It's possible to select/deselect individual messages, all messages, or even all concurrent (one-after-the-other) messages. You can do this using the options below, or by using keyboard shortcuts. For example, holding the Ctrl key (on Windows) or the Command key (on macOS) allows you to select individual messages. Using the Shift key allows you to select multiple concurrent messages. However, you can also use the select options from the dropdown:
- Select All - Selects all messages in the All Messages view.
- Deselect All - If any or all messages are selected in the All Messages view, this unselects them.
- Enable Select Mode - This allows users to select multiple different messages, individually, one at a time. Use this method for selecting different messages that are separated or scattered throughout your messages list so they can be moved, deleted, or otherwise handled the same.
Searching Messages
Using the standard search of your list of messages allows you to type in a domain name, full email address, or keywords to quickly find information. Mweb Mail also offers an advanced search option. For more information, see Searching Email Messages.
Sorting Messages
To sort messages, click on the Sort icon and select the field, or fields, you want to use for the sort order for your messages. For example, clicking the Sort icon and selecting "Size" will sort items in order of their size. (This includes the size of a message plus attachments.) To change the "direction" of the sort, either Ascending or Descending, select that option from the Sorting icon menu as well.
In general, the following sort options are available:
- Date - The date and/or time the mail system received the email.
- From - The sender of the email message.
- Subject - The subject of the email message.
- Size - The size of the email in kilobytes.
- Reverse Order - This reverses the sort order to either Descending or Ascending.
Filtering Messages
This includes read status (Read vs. Unread), whether or not you've replied to a message, whether a message is flagged, linked to a task, or has an attachment. It's also possible to filter messages based on message Category. Think of using a filter as a way to display only those messages that correspond to the criteria you've selected. If you filter messages with attachments, ONLY messages with attachments will be displayed.
Using a filter allows you to organise messages in your list based on specific criteria, or one or more Categories. Whereas sorting arranges ALL of the messages in a folder based on the criteria selected, filtering only displays messages based on the criteria or categories that are selected. It's then possible to sort those messages using one of the sorting options, mentioned below.
Filters offers the following options:
- All - Will display all messages. (The default filter.)
- Unread - Will display only messages marked as Unread.
- Read - Will display only messages marked as Read, hiding any unread messages.
- Replied - Will display only messages that have been replied to.
- Not Replied - Will display only messages that have no replies.
- Flagged - Will only display messages marked for follow up, or "flagged".
- Linked to Tasks - Will only display messages that are associated with Tasks.
- Attachments - Will only display messages that have one or more attachments.
Below these options is a list of categories that are available for filtering. All Categories is checked, by default, but it's possible to limit the filter to one or more specific categories as needed.
Manage Categories
You can also manage your categories from the Filtering menu. Clicking Manage Categories opens a modal window with all current categories listed. It's possible to do things like change a category name, change its associated colour, or even add new categories using this modal. Once categories are changed or modified, those changes or modifications are carried over to any area categories are available. (E.g., Calendars.)
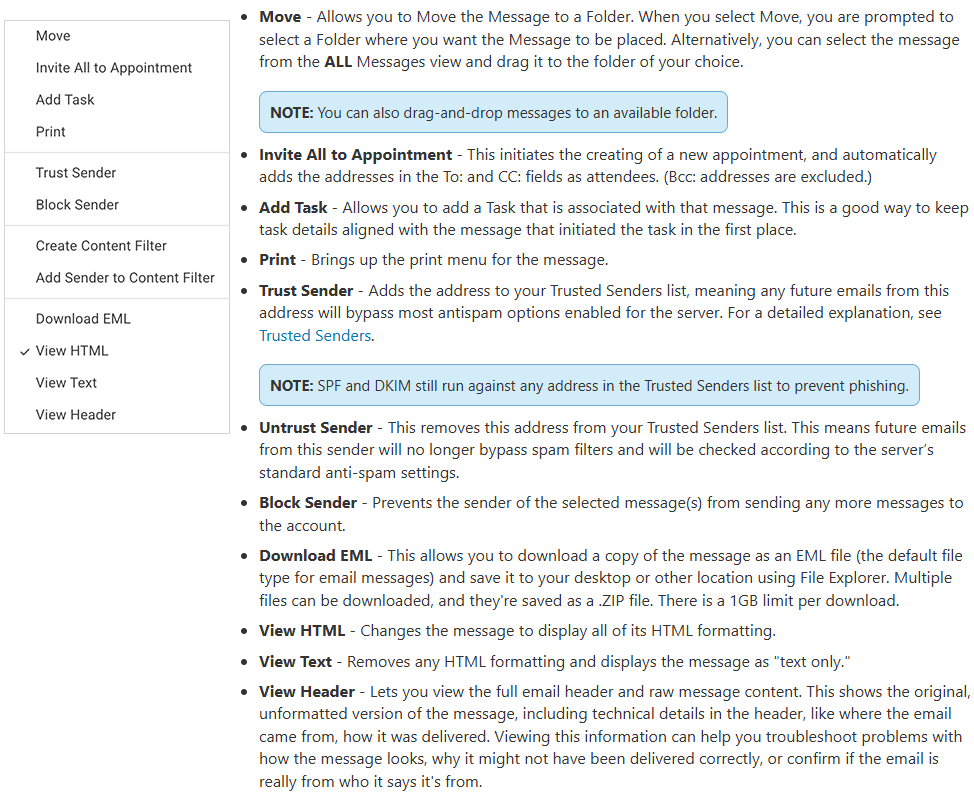
Email Actions
Using the Actions (⋮) button allows you to perform the following:
©Mweb (Pty) Ltd. All rights reserved.